
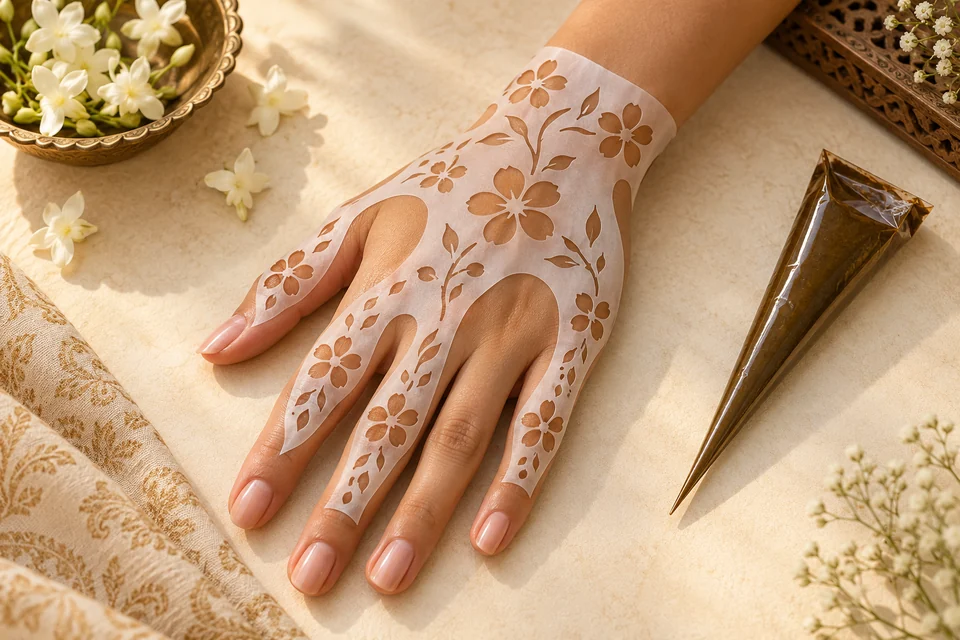
You love mehndi designs, but drawing freehand still seems complicated? A stencil can be a good way to start. It helps you position a flower, a bracelet-style design or a small composition without having to improvise every curve. However, it does not do everything for you: the design you choose, where you place it and how you apply the product all determine how crisp the result will be.
The important thing is to understand what a stencil can actually do for you. Some are simply outline guides. Others have cut-out sections that you fill in. Some are self-adhesive, while others are reusable. They do not all work in the same way, and not all are suitable for applying henna designs to skin.
This guide will help you find an easy-to-follow method, even for your very first attempt.
Contents
- What a stencil can — and cannot — do
- Choosing the right design
- Five steps to successful application
- Six hand stencil ideas
- Common problems and solutions
- FAQ
What a stencil can — and cannot — do
A stencil's main purpose is to hold a shape in place or provide a guide. This is useful if you want two symmetrical wristband designs or cannot yet keep the spacing between flower petals consistent. It does not, however, guarantee a perfect design: if the stencil shifts or the paste seeps beneath its edges, the outlines may become blurred.
It is also important to distinguish between three items often sold under similar names. A cut-out stencil allows the material to pass through openings. A transfer sticker applies a ready-made decoration without any henna drawing. A printed template simply gives you an image to copy. Before buying, check which type you are getting: the three do not produce the same result.
Key point: a henna stencil is a tool for placement and consistency, not a promise of automatic precision.
Choosing the right design
Start with the area, not the design
A large mandala may look magnificent in a photograph yet be impossible to position comfortably on a small hand. Before choosing, look at the available area: back of the hand, wrist, side of the index finger or outer edge. The more curved or mobile the surface, the more likely a rigid stencil is to lift away.
For a first attempt, choose a medium-sized design with openings wide enough to avoid clogged sections. Very fine cut-outs look appealing but take more skill to use. A five-petal flower, a small leaf or a repeating bracelet pattern will generally be easier to apply than an elaborate lace design.
The criteria that make all the difference
Scroll horizontally to read all columns.
| Criterion | Why it matters | Good practice |
|---|---|---|
| Flexibility of the material | Helps it follow the hand's curves | Test the positioning without product |
| Actual size | Avoids an out-of-proportion design | Measure the area before choosing |
| Width of the openings | Determines how easy they are to fill | Start with clearly defined spaces |
| Type of adhesion | Affects smudging and removal | Check that the product is intended for skin |
| Reusability | Determines maintenance and cost | Follow the manufacturer's instructions |
Do not assume that a craft stencil is necessarily suitable for skin contact. Adhesives and materials vary according to their original purpose. For an accessory sold for use on skin, check its stated purpose and instructions.
Five steps to successful application
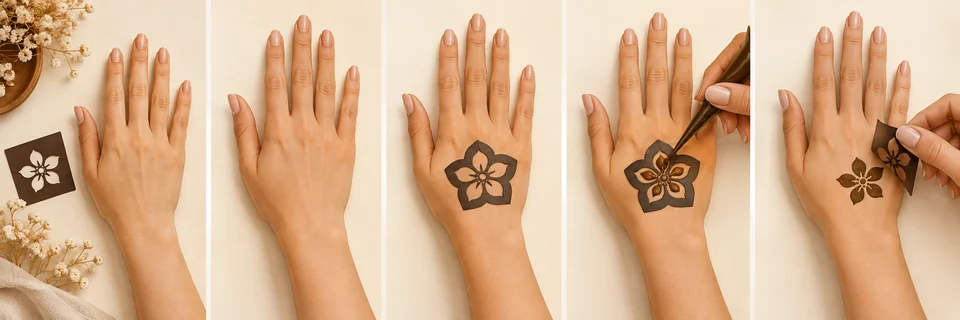
1. Plan your design
First, choose the hand and the position. Place the stencil on the skin without applying henna. Gently open and close your fingers: if the design distorts across a prominent crease, move it. A slightly off-centre composition may look more balanced than a perfectly centred design on a surface that is too rounded.
2. Prepare clean, dry skin
Wash and dry the area before application. Cream or oil residue can affect adhesion and make an edge lift. Do not apply to irritated or damaged skin. Also avoid leaving an adhesive stencil in place longer than the manufacturer recommends.
3. Secure the stencil gradually
Start at one end and work towards the other without pulling hard on the skin. Smooth the edges gently as you go. If a corner lifts, reposition it before applying the product; even a small loose corner may allow paste through and blur the line.
4. Apply a little product at a time
When using a cone, work in small areas rather than trying to fill every opening in one movement. With a fill-in stencil, a layer that is too thick can create raised patches and overflow. The right amount depends on how fluid the preparation is and on the stencil's instructions. Try it on a practice surface first to understand how it behaves.
5. Remove the stencil at the right time
Do not pull it off abruptly: remove it gently, following the instructions for both the stencil and the preparation. If the material is still movable, lifting the stencil may drag the edges of the design. If it sticks to the stencil, avoid tugging or rubbing vigorously. Do not assume there is one universal waiting time: products dry differently.
To learn how to hold a cone and control finger pressure without a stencil, our earlier guide How to Use a Henna Cone covers those techniques specifically.
Six hand stencil ideas
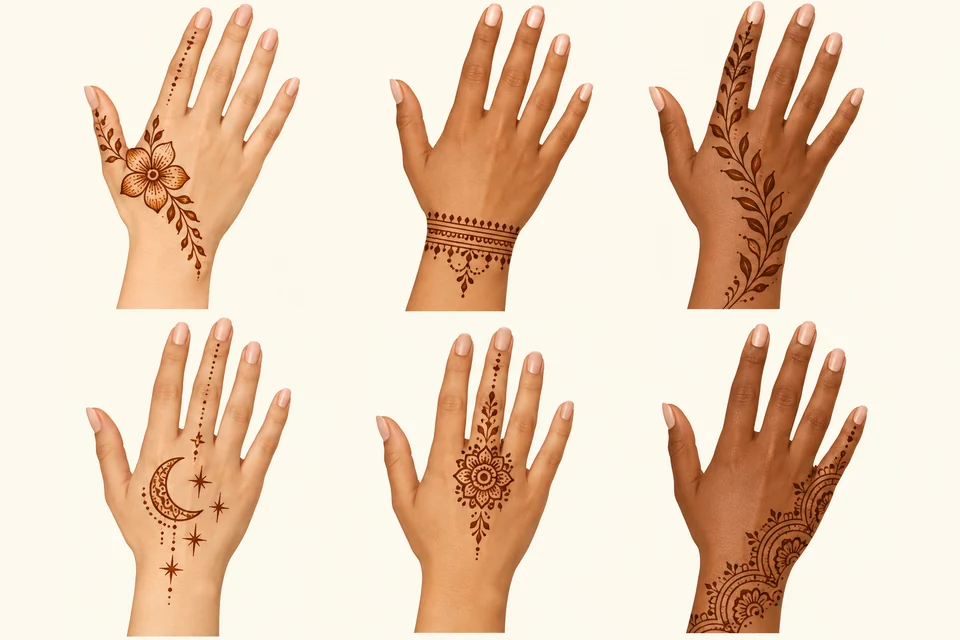
A flower near the thumb
A small flower on the fleshy area of the back of the hand stays visible even when the fingers are bent. It works well with five broad petals and a simple centre. For a first stencil, its rounded shape is more forgiving of minor differences in symmetry.
A wrist bracelet
A repeating pattern inspired by delicate jewellery lets you choose between a straight band and a gently curved composition. Pay attention to where the wrist bends: moving the band slightly is better than having a joint interrupt it.
A leafy branch
This elongated design can follow the edge of the hand. It is often easier to fit onto a small area than a large mandala. The gaps between the leaves matter as much as their outlines; without space, they merge and the design becomes harder to read.
A moon and three stars
For a contemporary design, a few well-separated elements work nicely in the area between the index finger and thumb. Choose solid or simple shapes: stars with extremely fine points are harder to fill neatly.
A rosette near the middle finger
A compact rosette catches the eye without covering the whole hand. If you want to extend the composition towards a finger, use a single botanical line rather than piling on details.
Half a lace pattern along the side
Instead of a full decorative glove, a half-lace pattern starting at the outer edge of the hand gives a lighter look. A stencil helps keep the loops evenly spaced, but it needs to be flexible enough to follow the hand's side.
Common problems and solutions
A blurred edge often indicates that the stencil moved, the product was too runny or too much was applied. Incomplete areas may result from a blocked cut-out or uneven pressure. If the composition looks unbalanced, the stencil may simply be the wrong size for the hand rather than there being a problem with your technique.
The most effective approach is to change just one variable at a time: position, stencil material or amount of product. That way, you can see what really improves the result. If you would rather try designs without a stencil, explore our easy henna designs for beginners
To practise using a cone before applying it to skin, a henna practice hand may help; protected paper is also a way to repeat the movements.
FAQ
Can you make your own stencil?
Yes, to create a template or paper guide. But a homemade cut-out paper stencil is not necessarily suitable for sticking to skin: choose a material intended for that purpose, or use your drawing as a visual reference to copy.
Does a stencil make a henna tattoo darker?
No. It helps with positioning and shape, not the chemistry of staining. The colour depends on the preparation and application conditions, not on whether a stencil was used.
Can the same stencil be used more than once?
Only if the manufacturer says it is reusable and explains how to clean it. A disposable adhesive stencil may lose its grip after the first removal.
Which design should you choose for a small hand?
A flower, a branch or a compact rosette generally works better than a large, densely detailed design. Check the actual size of the stencil, not just its photograph.
Does using a stencil replace learning to draw?
No, but it helps you understand placement, proportions and negative space. You can then recreate the same designs freehand with greater confidence.
Sources and guidance
- The stencil application steps above are practical editorial advice, not protocols validated by clinical studies; always follow the instructions for the accessories and preparations actually used.